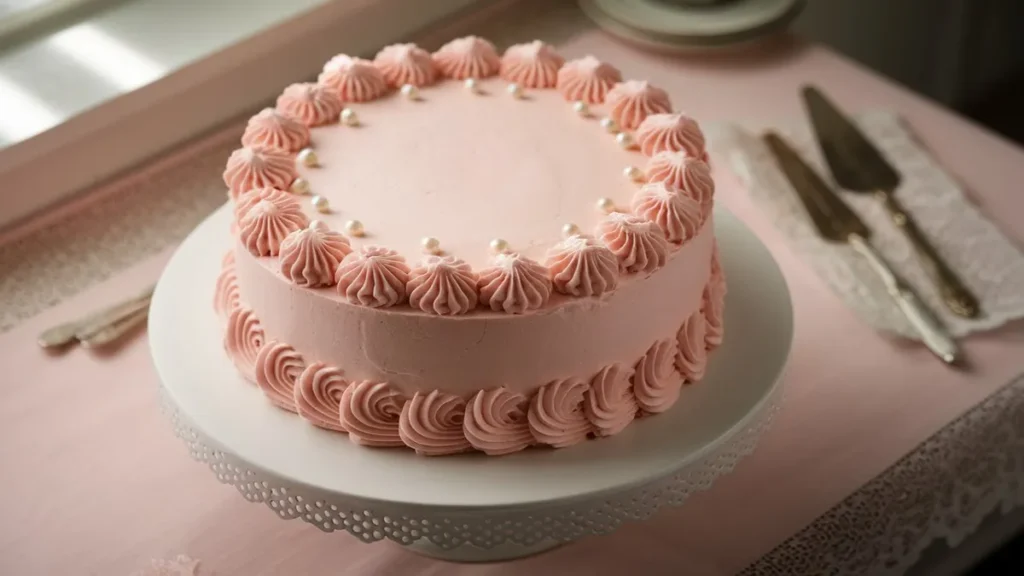
There’s something truly special about creating a vintage cake, the kind your grandmother might have baked. With swirls of buttercream and delicate piping, these cakes took time, care, and a little artistic flair.
As a home baker with years of experience crafting layered cakes for birthdays and weddings, I’ve come to appreciate the enduring allure of classic cake design. These cakes aren’t just desserts; they’re edible expressions of love, history, and celebration.
In this step-by-step guide, you’ll discover:
- How to Bake and Decorate a Vintage Cake
- The Best Frosting for Intricate Piping
- Pro-Level Decorating Tips Anyone Can Use at Home
Vintage cakes are ideal for celebrations, milestones, or any special occasion where elegance and nostalgia matter. Whether you’re just getting started or already confident with a piping bag, this tutorial offers practical advice, personal insights, and plenty of retro inspiration.
Let’s bring a little retro magic back to your kitchen one beautiful slice at a time. ✨
Key Takeaways
- A vintage cake is a classic dessert that harkens back to traditional baking techniques and flavors.
- Baking a vintage cake involves using simple ingredients and following a step-by-step process to achieve a delicious result.
- To bake a vintage cake, you’ll need basic tools like mixing bowls, measuring cups and spoons, a handheld or stand mixer, and cake pans.
- Classic frosting options for a vintage cake include buttercream, cream cheese, or a simple glaze.
- When decorating a vintage cake, consider using traditional piping techniques, edible flowers, or a dusting of powdered sugar for a timeless look.
Step-by-Step Guide to Baking a Vintage Cake

Making an old-fashioned cake begins with selecting a recipe that resonates with your taste and the occasion. Once you have chosen your cake flavor, gather all the necessary ingredients and equipment. A typical vintage cake recipe may include ingredients such as flour, sugar, eggs, butter, and baking powder, along with flavorings like vanilla or almond extract.
It is essential to use high-quality ingredients to achieve the best flavor and texture. Preheat your oven to the appropriate temperature, usually around 350°F (175°C). Prepare your cake pans by greasing them and lining them with parchment paper to ensure easy release after baking. The next step involves mixing the ingredients in the correct order.

Start by whipping the butter and sugar until they become airy and fluffy, which helps to incorporate air into the batter for a lighter texture. Gradually crack the eggs one by one, mixing thoroughly after each addition. In a separate bowl, combine the dry ingredients. Then alternate adding them with any liquid components, such as milk or buttermilk, to the creamed mixture.
Once everything is well combined, gently transfer the batter into your greased and lined cake pans. And then bake. For the recommended time. Usually 25-35 minutes. To check for doneness, place a toothpick inside. It should. Insert a toothpick in the center; if it comes out without wet batter, the cake is done. It’s ready to serve.
Equipment Needed
To successfully bake a vintage cake, having the right equipment is crucial. Essential tools: Make sure to include mixing bowls, measuring cups, measuring spoons, and a hand or stand mixer for creaming butter and sugar. You’ll also need spatulas for folding in ingredients. Additionally, you will need cake pans—typically round or square—depending on your desired shape.
For the best results, use high-quality, non-stick pans. If you’re using regular pans, make sure to grease and line them with parchment paper to prevent sticking.
A few other helpful tools include a cooling rack, which helps your cakes cool evenly. An offset spatula is perfect for spreading frosting smoothly. A turntable can be beneficial for decorating your cake, allowing you to rotate it easily while applying icing or decorations.
Lastly, having piping bags and various tips on hand will enable you to create intricate designs and embellishments that enhance the vintage aesthetic of your cake.
What Frosting to Use for a Vintage Cake
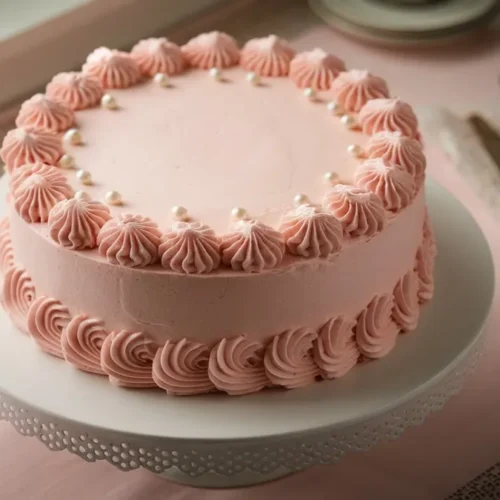
When it came to frosting this vintage cake, I chose a classic American buttercream—simple, smooth, and perfect for detailed piping work. To achieve that soft, romantic pink color, I added a touch of gel-based food coloring at the end and mixed gently until it reached the perfect blush tone. You can adjust the shade depending on your theme, but I find that pale pink adds the perfect vintage charm.
After your cake layers have cooled, spread a layer of buttercream between them, then apply a crumb coat to lock in the crumbs. Once chilled, finish with a second smooth layer of frosting.
If you want a full tutorial on how to apply frosting like a pro, I highly recommend this step-by-step guide to frosting a cake by King Arthur Baking. It walks you through everything from leveling to final smoothing — super helpful for beginners!
If you’d like to recreate the same look, you can follow this pink buttercream recipe. It’s light, pipeable, and ideal for vintage cake designs.
You’ll find the full recipe, with ingredients and instructions, at the bottom of this post. Scroll down whenever you’re ready to start baking.
🎯 Tips for Success: How to Nail Your Vintage Cake Every Time
Want bakery-level results at home? These simple but effective tips will help your vintage cake turn out beautifully, every single time. 💪
Practice Piping First: Grab a plate or parchment and test your piping before decorating your actual cake. It builds confidence and prevents messy designs.
Use Room Temperature Ingredients: Cold butter or eggs can ruin the texture. Let everything sit out for 30–60 minutes before baking.
Weigh Your Ingredients: For precision, use a kitchen scale instead of relying solely on measuring cups.
Don’t Rush the Creaming Step: Beat the butter and sugar until light and fluffy. It adds air and makes the cake soft and tender.
Level and Chill Your Layers: After baking, trim domed tops and chill the layers before frosting. This makes stacking and decorating much easier.
Classic Cake Decorating Tips and Tricks
Decorating a classic cake is an art form that combines creativity with technique. One fundamental tip is to level your cake layers before stacking them and trimming any domed tops with a serrated knife. Once stacked, apply a thin layer of frosting, known as a crumb coat, to seal in any loose crumbs. This prepares the cake before adding a final layer of frosting.
After smoothing your final layer, it’s time to decorate. Fit a piping bag with your favorite tip (like a 1M or 2D) and start with simple shapes like rosettes, shells, or elegant swirls around the edges.
If you’ve never piped before or want to level up your designs, this piping basics tutorial by Wilton is a must-read. It explains how to hold your bag, practice pressure, and use different tips to create beautiful borders and textures.
When it comes to embellishments, consider using fresh flowers, edible glitter, or vintage-inspired cake toppers to add character to your creation. Piping techniques can also elevate your design, especially if you’re decorating a heart vintage cake with layered shells and swirls for a romantic finish. If you love romantic designs, check out my heart-shaped cake design, a simple yet beautiful option for birthdays, anniversaries, or Valentine’s Day.
Finally, remember that less can be more. Sometimes, simple decorations can make a more significant impact than overly elaborate designs.
⚠️ 5 Common Mistakes That Can Ruin a Vintage Cake (and How to Avoid Them)
Mistakes happen, but with a little awareness, you can avoid the most common pitfalls that derail vintage cakes. 🚫
Not Planning Design in Advance
➤ Problem: Messy or unbalanced decor
➤ Fix: Sketch your design or choose a piping pattern ahead of time. A little prep goes a long way.
Overmixing the Batter
➤ Problem: Dense, tough cake
➤ Fix: Mix just until combined after adding flour or liquids. Don’t overwork it!
Skipping the Crumb Coat
➤ Problem: Frosting filled with crumbs
➤ Fix: Always apply a thin crumb coat and chill before the final layer of buttercream.
Using the Wrong Frosting Consistency
➤ Problem: Piping melts or collapses
➤ Fix: If the frosting is too soft, refrigerate it for 10–15 minutes. It should be firm but pipeable.
Hot Cake + Cold Frosting
➤ Problem: Frosting slides off or melts
➤ Fix: Make sure your cake is completely cool before frosting. Patience = perfect results.
Tool Variations and Substitutions
Don’t worry if you don’t have all the classic cake tools — you can still create a beautiful vintage cake with a few creative swaps. 🧁🪄
| Traditional Tool | Alternative Option |
|---|---|
| Piping bags + tips | Ziplock bags with the corners snipped |
| Cake turntable | Lazy Susan or rotating cutting board |
| Offset spatula | Butter knife or the back of a spoon |
| Stand mixer | Hand mixer or whisk (with effort!) |
🧊 How to Store a Vintage Cake
Proper storage keeps your vintage cake tasting fresh and looking fabulous. 🎂✨
Freezer: Vintage cakes freeze well! Wrap unfrosted cake layers tightly in plastic wrap and foil, and freeze for up to 2 months. Thaw overnight in the fridge before decorating.
Room Temperature: If your cake is frosted with buttercream and the room is cool (around 65–70°F / 18–21°C), it can sit out in a covered cake dome or an airtight container for up to 2 days.
Refrigerator: For longer freshness (especially if you’re using cream cheese frosting), store the cake in the fridge. Cover it well to avoid drying out, and allow it to come to room temperature before serving.
🍽️ Health Note: Enjoy in Moderation
As beautiful and delicious as vintage cakes are, they’re still a treat, meant to be enjoyed occasionally. ❤️
- Rich ingredients: Buttercream, sugar, and food coloring can be heavy on the stomach if eaten in large quantities.
- Empty stomach warning: Avoid eating vintage cake on an empty stomach, as the sugar and fat may cause discomfort or nausea for some people.
- Portion control: A small slice is often enough to enjoy the flavor without overwhelming your digestion.
If you have food sensitivities, consider using reduced-sugar recipes or plant-based frostings to make your cake more gut-friendly. 🍃
Your health matters — so treat yourself with love, but balance it with care. 💛
FAQs
What is the vintage cake style called?
The vintage cake style is often known as Lambeth piping or simply retro buttercream cake design. It features ornate piping, pastel colors, swirls, shell borders, and classic embellishments like cherries or edible pearls. This style is inspired by cake decorating trends from the mid-20th century.
What is a vintage cake?
A classic cake is a nostalgic-style dessert that blends classic cake flavors with old-fashioned buttercream decorating techniques. People often choose these cakes for birthdays, weddings, and other special occasions because of their romantic and elegant presentation. Common characteristics include intricate piping, heart shapes, cursive messages, and soft color palettes.
Are vintage cakes trending?
Yes, they are extremely trendy right now, especially on platforms like TikTok, Pinterest, and Instagram. Their blend of retro aesthetics and handmade charm has brought them back into the spotlight, particularly for birthdays, bridal showers, and aesthetic-themed parties.
Does Walmart make vintage cakes?
Yes, Walmart recently began offering vintage-style cakes, including heart-shaped and pastel-themed designs, at affordable prices ranging from $5 to $25. Although they might not provide the same intricate custom detailing as a specialty bakery, they provide a budget-friendly option for those wanting a vintage-style cake quickly and easily. Availability may vary by store, so it’s a good idea to call ahead or check online.
Related Posts
Looking for more vintage cake inspiration? You might enjoy:
- 🎀Vintage Cake Ideas for Girls – Sweet pastel themes, hearts, bows, and birthday-ready designs
- 🍰Simple Vintage Cake Ideas – Beginner-friendly cakes that look beautiful with minimal effort
Conclusion
In conclusion, baking and decorating are timeless and rewarding experiences. By following a step-by-step recipe and embracing classic techniques, you can create a beautiful dessert that honors the charm and elegance of traditional baking.
Tried this recipe? Rate it below and leave a comment — I’d love to hear how your vintage cake turned out!
Pink Vintage Cake
Equipment
- 3 x 6-inch round cake pans
- Hand or stand mixer
- Mixing bowls
- Cake turntable
- Offset spatula
- Bench scraper or tall cake scraper
- Piping bags
- Star piping tip (e.g., Wilton 1M or 2D)
- Edible pearls (optional)
- Cooling rack
- Gel food coloring
Ingredients
For Cake
- 2 ½ cups 300g cake flour
- 2 ½ tsp baking powder
- ½ tsp salt
- 1 cup 226g unsalted butter, room temperature
- 1 ¾ cups 350g granulated sugar
- 4 large eggs room temperature
- 1 tbsp vanilla extract
- 1 cup 240ml whole milk
- For the Filling:
- ½ cup strawberry jam homemade or store-bought
For the Swiss Meringue Buttercream
- 5 large egg whites
- 1 ¼ cups 250g granulated sugar
- 1 ½ cups 340g unsalted butter, cubed and room temp
- 1 tsp vanilla extract
- Pink gel food coloring
- Optional: Edible pearls or sprinkles for decoration
Instructions
Bake the Cake:
- Preheat oven to 350°F (175°C). Grease and line three 6-inch round cake pans.
- Whisk flour, baking powder, and salt in a bowl. In a mixer, cream butter and sugar until light. Add eggs one at a time, then vanilla. Alternate adding flour and milk. Divide batter evenly and bake 25–30 minutes. Cool completely.
- Make Swiss Meringue Buttercream:
- Whisk egg whites and sugar in a heatproof bowl over simmering water until sugar dissolves (160°F/70°C). Transfer to mixer and whisk to stiff peaks. Slowly add butter one cube at a time. Mix until smooth. Add vanilla and pink coloring.
- Assemble the Cake:
- Level cake layers. Place one on a cake board, spread a thin layer of buttercream, then jam. Repeat for other layers.
- Crumb Coat and Chill:
- Apply a thin layer of buttercream all over to trap crumbs. Chill 15 minutes.
- Final Frosting:
- Apply a smooth final coat using an offset spatula and scraper. Chill again briefly.
Decorate:
- Use a star piping tip to pipe swirls around the top and base. Place edible pearls between swirls for a vintage effect.
Notes
- Use gel food coloring — it won’t thin out your buttercream like liquid coloring.
- If your buttercream curdles, keep mixing until smooth again.
- Pipe on parchment paper first to test shapes and pressure before decorating your cake.
- Swap strawberry jam with raspberry or lemon curd for a different flavor twist.